

Host a private workflow connector
Run a workflow connector on your own servers and add it to your workspace, where workflows, Genies and AI assistants connected through Stacksync MCP can use it.
A private workflow connector is one you build with the Stacksync CLI and host yourself. You add its URL to your workspace in Developer Studio, and only your workspace can use it. There is no Stacksync review: its modules are available as soon as you add it.
Use it for an internal system, a proprietary application or an API that must not leave your infrastructure. To publish a connector that Stacksync hosts for every workspace, deploy it instead. The same project works both ways.
Where your workspace can use it
| Where | How |
|---|---|
| Workflows | Add a step and choose the connector, as with any other app. |
| Genies | Add its modules as skills on the genie's Skills step. |
| Stacksync MCP | Your AI assistant can find and run its actions through Stacksync MCP Gateway. |
Host it
Build and test the connector
Build the connector, run the standard check, and test every module with stacksync workflow-connector run.
Serve it from your own servers
The project that stacksync workflow-connector create made is a standard Python web app: main.py defines app. Host it on any server or container platform:
- Use Python 3.10 or later, with
gitavailable while installing:requirements.txtinstalls the Stacksync CDK from GitHub. - Install the dependencies with
pip install -r requirements.txt, then a web server withpip install gunicorn:requirements.txtdoesn't include one. - Start it with
gunicorn main:app, or any other WSGI server, on any port.
Keep stacksync.yml in the project: its app_settings (name, icon and connection type) are what the connector reports to Stacksync. Its deployment_settings are only used by the CLI.
If you use containers, write your own Dockerfile, for example:
FROM python:3.11-slim
WORKDIR /usr/src/app
# git: requirements.txt installs the Stacksync CDK from GitHub
RUN apt-get update && apt-get install -y git && rm -rf /var/lib/apt/lists/*
COPY requirements.txt ./
RUN pip install --no-cache-dir -r requirements.txt gunicorn==26.2.0
COPY . .
RUN useradd --create-home app
USER app
EXPOSE 8080
CMD exec gunicorn --bind 0.0.0.0:8080 --timeout 360 main:app
Add a .dockerignore next to it so local files stay out of the image:
.env*
.venv
.logs
.stacksync_*
If you later deploy the same project, Stacksync builds and hosts it its own way, so your Dockerfile doesn't affect it.
Stacksync reaches your connector over the internet. Developer Studio accepts its address only when it:
- uses
https; plainhttpis refused - is public;
localhost, private networks and internal addresses are refused - answers
/app-configwithin 10 seconds
Treat the connector's URL as public. Each request carries the credentials of the connection the user chose: take every credential from the request, never from secrets stored on your server, and refuse a request that carries none.
Turn on Developer Options
In Stacksync, open your Profile and turn on Developer Options. Developer Studio appears in the side menu.
Add it in Developer Studio
The connector is created in the region you have selected in Stacksync, so switch to the region you want first. Then open Developer Studio and select Create app. Enter the connector's URL in Serving URL and select Create.
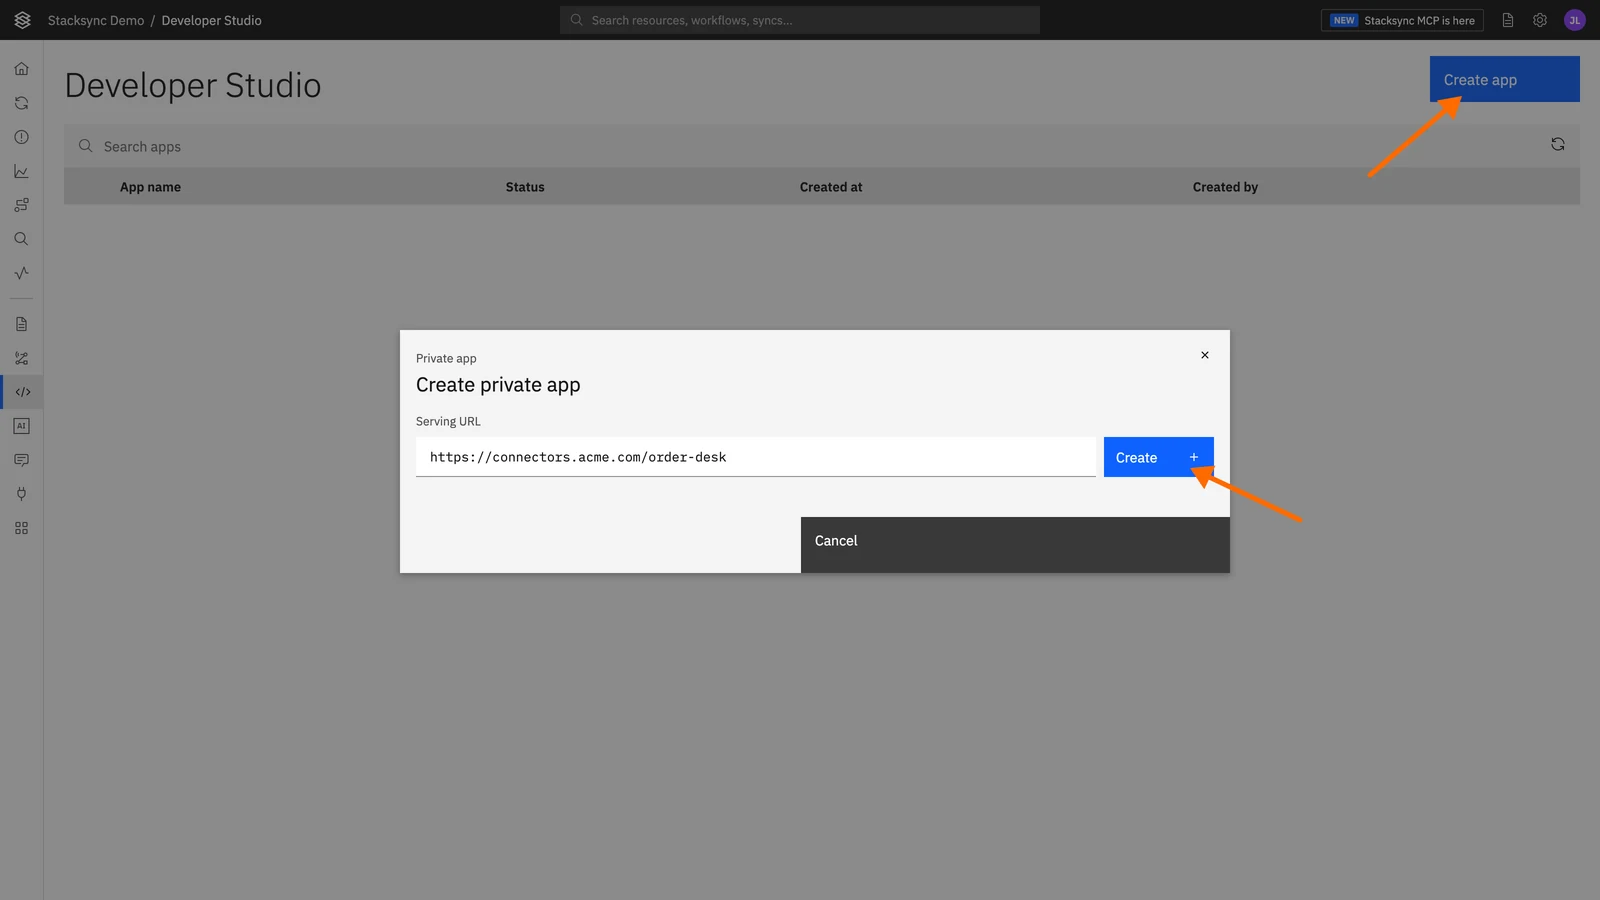
Stacksync reads the connector's /app-config to find its modules. If it can't reach the URL or read /app-config, the connector is not added and Developer Studio shows an error.
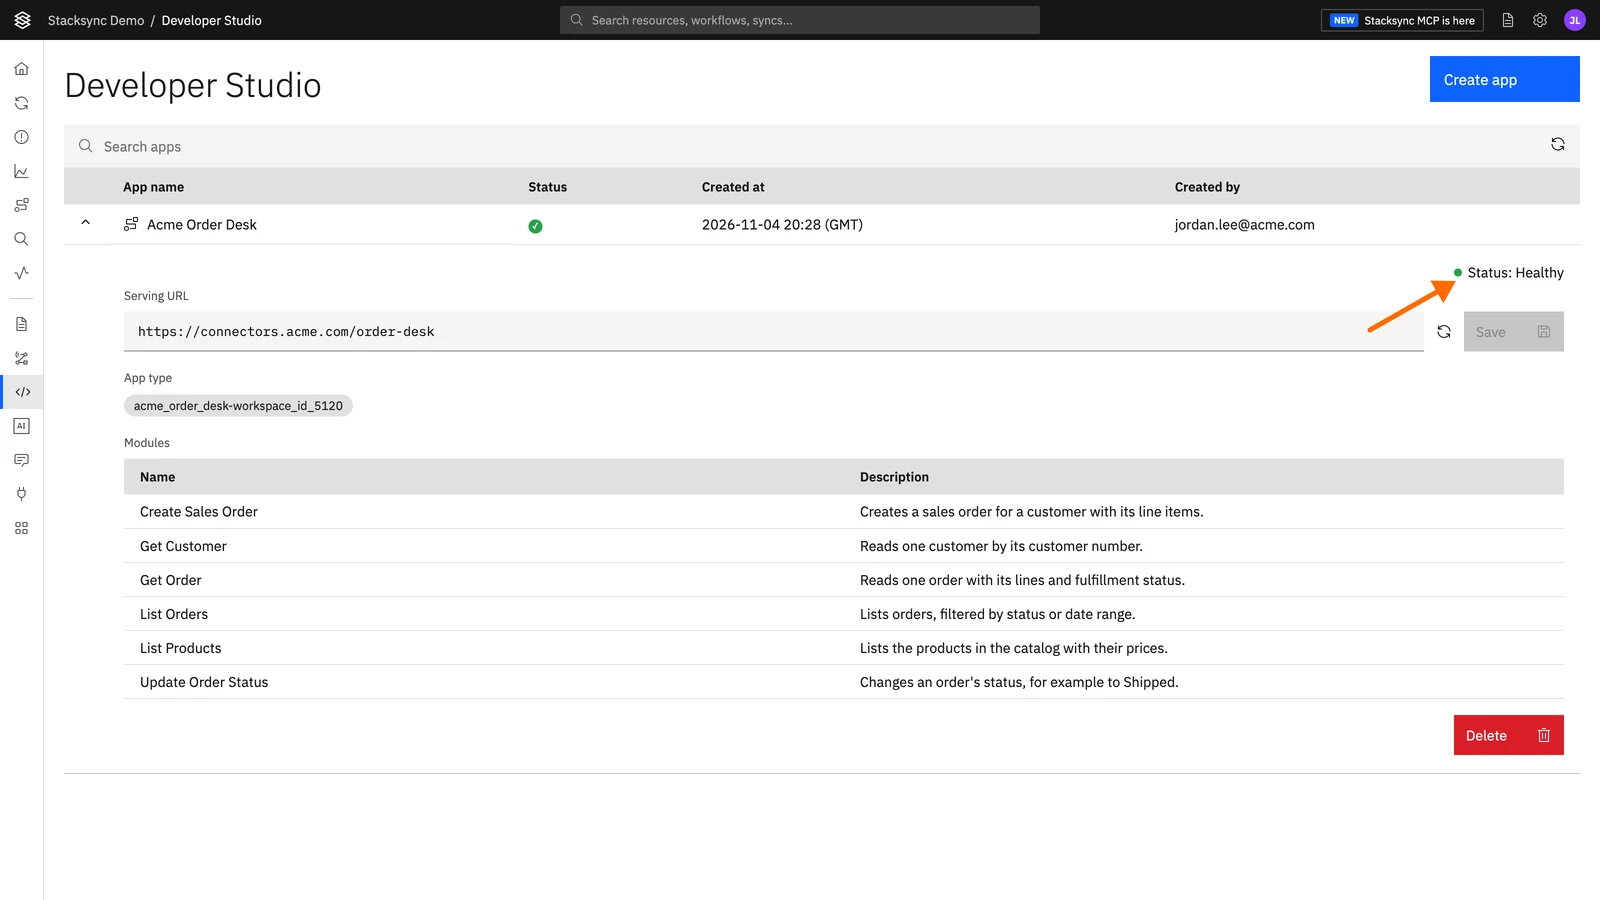
The connector is listed with its status, app type and modules. Status: Healthy means Stacksync can reach it.
Use it in a Genie
Private connector modules appear in the Genie skill picker with your other apps. A skill asks for the connection type the connector declares, such as Generic API Credentials. A module whose connection is optional can be used without one.
When the Genie setup suggests a private connector module as a skill, it turns on Require approval, because the module's name and description come from your code rather than from Stacksync. You can change this on the Skills step.
Use it through Stacksync MCP
Your AI assistant can list the connector's actions, read their forms and run them, like the actions of any connected app.
- Running a private connector action counts as a change, so it needs the editor role or higher and follows Ask before every change.
- MCP Gateway Policies allow private connectors only when the policy allows All apps. A policy that selects specific apps doesn't include them.
- Every call appears in the MCP Activity Log.
Update or remove it
To update the connector, restart your server with the new code. When you add or change a module, Genies and AI assistants see it within 5 minutes.
If the connector doesn't answer, its modules are left out of Genies and MCP until it answers again; your other apps keep working. Workflow steps that use it fail while it is down.
To move the connector to a new address, open it in Developer Studio, change Serving URL and select Save. To remove it, select Delete.
Three ways to run a connector
stacksync workflow-connector run | Private connector | Deployed connector | |
|---|---|---|---|
| What it is for | Developing and testing | Your own systems, kept in your workspace | Publishing to every workspace |
| Where the code runs | Your computer | Your servers | Stacksync's servers |
| Who can use it | Your workspace only | Your workspace only | Every Stacksync workspace |
| How long it lasts | Until you stop run | Until you delete it in Developer Studio | Until it's removed |
| Review | None | None | A Stacksync reviewer approves it |
| How you add it | stacksync workflow-connector run | Create app in Developer Studio | stacksync workflow-connector deploy |
There is no CLI command that registers a self hosted connector: add its URL in Developer Studio.
Deploy a workflow connector
How a workflow connector is deployed: the connector standard, the checks on submission, Stacksync's review, the build, the statuses, the emails and how to ship updates.
CLI command reference
Every Stacksync CLI command with its arguments, options, environment variables, files and exit codes.